Cocoapods 使用
cocoapods 是 xcode 的包管理工具, 用于管理开发过程中所使用的各种依赖, 运行在 ruby 环境中.

安装
sudo gem install cocoapods常用命令
pod init: 进入项目所在文件夹, 在项目文件夹中打开终端对项目进行pod初始化, 生成Podfile文件pod install: 对比Podfile与Podfile.lock文件- 对于
Podfile.lock中没有记录的库, 根据本地中央仓库~/.cocoapods/repo/中的 master(或私有索引库) 安装最新版本 (或指定的自定义版本), 并将此库的此版本记录在Podfile.lock文件中 - 对于在
Podfile.lock中已经有记录的库, 只根据Podfile.lock中记录的版本在~/.cocoapods/repo中的master(或私有索引库) 查找并安装, 并不会安装此库在~/.cocoapods/repo中已存在的新版本 - 第一次运行 pod install 的时候,
.xcworkspace项目和 Pods 目录还不存在, pod install 命令也会创建.xcworkspace和 Pods 目录, 但这是pod install命令的顺带作用, 而不是它的主要作用.
- 对于
pod install --no-repo-updatepod outdated: 列出 Podfile.lock 中记录的有新版本的库.pod update: (忽略 Podfile.lock 文件的锁定版本) 先拉取远程 cocoapods 中央仓库 (可以认为执行了 pod repo update), 然后更新Podfile中的所有涉及库, 最后在Podfile.lock中更新所有涉及库的版本号pod update [pod1]: (忽略 Podfile.lock 文件的锁定版本) 先拉取远程 cocoapods 中央仓库 (可以认为执行了 pod repo update), 然后更新Podfile中的库pod1, 最后在Podfile.lock中更新库pod1的版本pod update --no-repo-update: 因为拉取远程 cocoapods 中央仓库比较慢, 甚至可能断线, 因此本命令规定只根据本地~/.cocoapods/repo/中的版本进行更新在Podfile中涉及的库, 并在Podfile.lock中更新此库的版本pod repo update [私有索引库名]: 更新 cocoapod 的中央仓库, 用git pull的方式从 https://github.com/CocoaPods/Specs 拉取到本地~/.cocoapods/repo/master, 如果有私有索引库也会更新私有索引库; 如果后面添加私有索引库名, 则仅更新私有索引库, 同pod repo update ~/.cocoapods/repo/...pod spec create HLDeviceKit: 创建一个名为HLDevice的 cocoapods 仓库用于提交到 cocoapods(会生成一个HLDevice.podspec文件)pod spec lint --verbose: 检查本地 pod 有无错误, 在提交前进行检查, 出现错误可以对照修改pod trunk register hanley.lei@gmail.com 'Hanley Lee' --description='MBP' --verbose: 注册 cocoapods 用户, 会发邮件进行验证pod trunk me: 检查当前用户的信息 (返回当前用户的姓名, 邮箱, 名下 pods 等)pod trunk push HLDeviceKit: 将 podsHLDeviceKit提交到 cocoapodspod search HLDeviceKit: 在 cocoapods 官方库中进行搜索HLDeviceKitpod trunk add-owner HLDeviceKit abc@gmail.com: 添加协作者, 开发权限给协作者使其可以更新 pods 版本pod repo add <私有索引库名> < 私有索引库地址 >: 根据输入私有索引库名 (可自定义) 在~/cocoapods/repo/目录中生成文件夹, 并在文件夹中存放从私有库地址中拉取的仓库pod repo remove <私有索引库名>: 移除本地私有索引库pod repo push <私有索引库名> <podspec 文件名 >: 私有资源库完成更新后, 更新私有索引库指向私有资源库最新版本. (如果就在本项目目录下, 且当前目录下就有podspec文件, 则可省略为pod repo push < 私有索引库名 >)pod cache:cocoapods在第一次安装完库到项目中时, 会将此库缓存在本地的/Library/Caches/Cocoapods/Pods中, 方便下一次安装此库时直接安装 (当然, 下一次安装时会对比版本号)pod cache list: 列出要清理缓存的项目 (在本地/Library/Caches/Cocoapods/Pods下的缓存)pod cache clean --all: 清理pod cache list列出的所有的缓存pod cache clean HLTest: 指定缓存名清理缓存, 会列出/Library/Caches/Cocoapods/Pods/External与/Library/Caches/Cocoapods/Pods/Release中的所有名为HLTest的缓存, 让用户选择清理哪一个pod cache clean HLTest --all: 清理所有已安装的名为HLTest的pod, 会清理/Library/Caches/Cocoapods/Pods/External与/Library/Caches/Cocoapods/Pods/Release中的所有名为HLTest的缓存
在命令末尾加上一些命令可以表示附加作用:
--verbose: 可以看到具体的操作详情, 这样在一些耗时操作中可以避免误认为 “死机” 了, e.g.pod repo push <私有索引库名> <podspec 文件名 > --verbose--allow-warnings: 允许在有 warning 的情况下推送 pod 版本到中央仓库或私有仓库, e.g.pod repo push <私有索引库名> <podspec 文件名 > --allow-warnings--use-modular-headers: 对于含有Swift代码的pod, 所依赖的Objective-C的pod, 无论私有pod或第三方pod都必须启用modular headers. 否则会在pod install或update的时候报错.--use-frameworks: 将所有的 pods 作为动态库导入 (制作库时意思是将本库作为动态库打包). Cocoapods 默认是将第三方库作为静态库 (static library) 导入的, 但是有些库如果以静态库导入会报错, 如WCDB--use-libraries: Lint uses static libraries to install the spec--quick: Lint skips checks that would require to download and build the spec--subspec=NAME: Lint validates only the given subspec--sources=https://github.com/artsy/Specs,master: The sources from which to pull dependent pods (defaults to <https: //github.com/CocoaPods/Specs.git>). Multiple sources must be comma-delimited.--no-private: Lint skips checks that apply only to public specs--swift-version=VERSION: The SWIFT_VERSION that should be used to lint the spec. This takes precedence over a .swift-version file.--skip-import-validation: Lint skips validating that the pod can be imported--skip-tests: Lint skips building and running tests during validation--silent: Show nothing--verbose: Show more debugging information--no-ansi: Show output without ANSI codes--help: Show help banner of specified
静态库与动态库
CocoaPods 会将每个 pod 转换为 Umbrella Framework 并添加 module map 使其支持模块. 因此, 每个 Pod 的 Supporting File 中会有两个对应的文件
PodName-umbrella.h: Umbrella HeaderPodName.modulemap: Module Map
将自定义 pods 提交到 cocoapods 中央仓库
原理是在本地的需要提交的库中配置 *.podsepc 文件, 在其中设置远程 GitHub 上的库地址以及版本号, 然后提交配置好的 *.podspec 文件到 cocoapods 官网 (需验证邮箱), 以后每次更新 cocoapods 都是修改 *.podspec 文件中的版本号.
步骤
- 在本地创建一个仓库, 在
GitHub上创建一个仓库, 将本地仓库的远程仓库地址设置为GitHub仓库:git remote set-url origin https://github.com/HanleyLee/HLDeviceKit.git - 添加
HLDeviceKit.podspec文件:pod spec create HLDeviceKit - 编辑
HLDeviceKit.podspec文件, 具体格式参考 [podsepc 模板](#podsepc\ 模板) 一节 - 将当前仓库
commit并push到GitHub, 并设置tag为1.0.0bashgit add . git commit git tag 1.0.0 git push git push origin --tags - 本地验证bash
pod spec lint --allow-warnings # 如果使用了私有静态库的话, 则使用如下方式进行验证 # pod spec lint --sources=****/****.git,https://github.com/CocoaPods/Specs.git --use-libraries --allow-warnings - 注册
cocoapods:pod trunk register hanley.lei@gmail.com - 提交到
cocoapods:pod trunk push HLDeviceKit, 此命令相当于做了三件事:- 验证本地的
podspec文件, 也可以使用pod spec lint验证 - 上传
podspec文件到trunk服务 - 将
HLDeviceKit.podspec文件转为HLDeviceKit.podspec.json文件
- 验证本地的
完成
在
GitHub的cocoapods官方仓库中可以立刻看到刚刚提交的pods及版本号 (是作为commit出现的, 相当于给cocoapods官方仓库贡献了一次commit)
使用 Cocoapods 创建私有库并使用
理论上使用私有库的话会需要索引库与资源库两部分, 但是有些项目将一个库同时作为索引库和资源库, 这样也是可以的. 下面的示例即版本库与资源库分离的使用方法
创建私有索引库
- 使用
GitHub在远程创建一个仓库 (最好创建时选择添加一个README.md文件, 这样会自动生成master分支) 将远程创建的仓库 (索引库) 添加到本地 (会被下载到
~/.cocoapods/repo中)pod repo add <私有仓库名> < 私有仓库地址 >e.g.
pod repo add HLPodSpecs git@github.com:HanleyLee/HLPodSpecs.git
更新私有索引库
- 对私有资源库做功能添加等改动
- 在
podspec文件中spec.version填写新版本号 (例如0.0.1) - 新建
commit, 为新建的commit打上与spec.version相同版本号的tag(即0.0.1), 并push到远程私有资源库 将描述文件推送到私有索引库
pod repo push HLPodSpecs HLTest.podspec --allow-warnings --verbose:Validating spec: 验证 podspec 书写方式Analyzing dependencies: 分析所有依赖项- 拉取
podsepc文件中指明的所有依赖的podspec文件 - 验证依赖之间是否互相引用 (相互引用报错)
- 验证本 pod 最低版本环境是否同时符合子依赖的最低版本环境
- 拉取
Downloading dependencies: 下载并安装依赖项根据在
podspec文件中确定的source的git信息及版本号和所依赖的pods及其版本号是否已在~/Library/Caches/CocoaPods/Pods/External与~/Library/Caches/CocoaPods/Pods/Release中是否已经存在:- 已存在: 直接 copy 该文件夹到
/private/var/folders中~/Library/Caches/CocoaPods/Pods/External与~/Library/Caches/CocoaPods/Pods/Release中, 然后将这两个文件夹复制到/private/var/folders中 - 未存在: 使用
git pull拉取远程私有资源库及相应依赖的对应 tag(如果找不到则报错) 到
- 已存在: 直接 copy 该文件夹到
Generating Pods project: 将本 pod 及上一步下载的所有依赖 pod 生成为多个项目Interating client project: 将上一步所有依赖生成的多个项目合并到主项目中 (本步骤中会验证各依赖中引用变量, 耗时较长)Updating the HLPodSpecs repo: 上一步验证成功, 拉取远程私有索引库到本地~/.cocoapods/repo/HLPodSpecs中Adding the spec to the HLPodSpecs repo: 在~/.cocoapods/repo/HLPodSpecs创建新版本号文件夹, 并将新版本文件podspec放入新版本号文件夹中. 产生一个新的 commit(名字为[Add] HLTest(0.0.1))Pushing the HLPodSpecs repo: 提交本地最新的私有索引库~/.cocoapods/repo/HLPodSpecs到远程
在多次提交本地 pod 更新失败且 cocoapods 给出的信息是某某文件重复存在, 但是你检查了本地和远程都已经删除了此文件, 那么可能是缓存搞的鬼, 此时需要
pod cache clean --all清理所有缓存然后重新pod repo push <私有仓库名> <podsepc 名 >
使用私有索引库
- 使用私有
pod库的需要在Podflie中添加source 'git@github.com:HanleyLee/HLPodSpecs.git', 指明你的私有索引库地址. - 如果要使用
cocoapods的中央仓库中的库, 还要添加source 'https://github.com/CocoaPods/Specs.git' pod install
最终的 Podfile 文件如下:
platform :ios, '10.0'

# For CocoaPods 1.8.0 或以上版本, 使用 cdn 来避免 clone master, 加快 pod update 的速度.
#source 'https://github.com/CocoaPods/Specs.git'
source 'https://cdn.cocoapods.org/'

source 'git@github.com:HanleyLee/HLPodSpecs.git'

target 'test02' do
  use_frameworks!
  pod 'HLTest'
end
Podfile 相关
Podfile 模板
platform :ios, '10.0'

# For CocoaPods 1.8.0 或以上版本, 使用 cdn 来避免 clone master, 加快 pod update 的速度.

#source 'https://github.com/CocoaPods/Specs.git'
source 'https://cdn.cocoapods.org/'

# 私有库
source 'http://192.168.1.203/iOS/ZRBase.git'

#消除第三方库的黄色警告
inhibit_all_warnings!
# 以动态库方式使用这些 Pods
use_frameworks!

def shared_pods
  pod 'ZRBase'
  pod 'RxSwift'
  pod 'RxCocoa'
end

target 'MyApplication' do
  shared_pods
end
指定 cdn 源, 加快 pod update 速度
# For CocoaPods 1.8.0 或以上版本, 使用 cdn 来避免 clone master, 加快 pod update 的速度.
# source 'https://github.com/CocoaPods/Specs.git'
source 'https://cdn.cocoapods.org/'
指定安装来源
pod 'PonyDebugger', :source => 'https://github.com/CocoaPods/Specs.git'
pod 'PonyDebugger', :source => 'https://cdn.cocoapods.org' # Using pod from specific source

pod 'AFNetworking', :path => '~/Documents/AFNetworking' # Using the files from a local path

pod 'AFNetworking', :git => 'https://github.com/gowalla/AFNetworking.git' # Using the master branch of the repo
pod 'AFNetworking', :git => 'https://github.com/gowalla/AFNetworking.git', :branch => 'dev' # Using a different branch of the repo
pod 'AFNetworking', :git => 'https://github.com/gowalla/AFNetworking.git', :tag => '0.7.0' # Using a tag of the repo
pod 'AFNetworking', :git => 'https://github.com/gowalla/AFNetworking.git', :commit => '082f8319af' # Using a commit id of the repo

pod 'JSONKit', :podspec => 'https://example.com/JSONKit.podspec' # Refer a pod from a podspec via HTTP
pod 'JSONKit', :podspec => '~/Documents/JSONKit.podspec' # Refer a pod from a podspec via local path
指定 pod 版本
pod 'AFNetworking'                  # 不显式指定依赖库版本, 表示每次都获取最新版本
pod 'AFNetworking', '~> 0'          # 高于 0 但小于 1 的版本(不包含 1)

pod 'AFNetworking', '~> 0.1.2'      # 使用大于等于 0.1.2 但小于 0.2 的版本(不包含 0.2)
pod 'AFNetworking', '~> 0.1'        # 使用大于等于 0.1 但小于 1.0 的版本

pod 'AFNetworking', '0.1.2-beta.0'  # Beta and release versions for 0.1.3, release versions up to 0.2 excluding 0.2.
                                    # Components separated by a dash (-) will not be considered for the version requirement.

pod 'AFNetworking', '2.0'           # 只使用 2.0 版本
pod 'AFNetworking', '= 2.0'         # 只使用 2.0 版本

pod 'AFNetworking', '> 2.0'         # 使用高于 2.0 的版本
pod 'AFNetworking', '>= 2.0'        # 使用大于或等于 2.0 的版本
pod 'AFNetworking', '< 2.0'         # 使用小于 2.0 的版本
pod 'AFNetworking', '<= 2.0'        # 使用小于或等于 2.0 的版本

pod 'AFNetworking', :git => 'http://gitlab.xxxx.com/AFNetworking.git' # 手动指定仓库
pod 'AFNetworking', :git => 'http://gitlab.xxxx.com/AFNetworking.git', :branch => 'R20161010' # 指定分支
pod 'AFNetworking', :path => '../AFNetworking'  # 指定本地库
Other option
pod 'PonyDebugger', :configurations => ['Debug', 'Beta'] # Using dependency in configurations
pod 'PonyDebugger', :configuration => 'Debug' # Using dependency in configurations

pod 'SSZipArchive', :modular_headers => true

pod 'QueryKit/Attribute' # Using subspec
pod 'QueryKit', :subspecs => ['Attribute', 'QuerySet'] # Using subspecs

pod 'AFNetworking', :testspecs => ['UnitTests', 'SomeOtherTests']
Podfile.lock 文件作用
Podfile.lock 文件能锁定库版本号, 在团队开发中, 能在 A pod install 的 pod1 版本为 1.0.0 的情况下, 确保团队成员 B 在 pod install 时也安装 pod1 的 1.0.0 版本 (哪怕 pod1 有更新).
Pod 文件夹保存了 Pod 的所有文件, 可以根据个人喜好选择放不放入 git, 不放入的话整个 git 文件夹体积小, 但是使用者使用时需要使用 pod install 来安装在 Podfile 中提到的库
但是 Podfile.lock 是必须要放到 git 管理的, 确保开发者和用户使用的是同一个版本的 pod 库
Podfile.lock 文件结构
PODS: # 所有使用到的依赖 (如果依赖有依赖, 那么会将依赖的依赖也遍历出来)
  - RxCocoa (4.0.0):
    - RxSwift (~> 4.0)
  - RxSwift (4.0.0)
  - SnapKit (4.0.0)
  - HLBase (0.0.22):
    - HLBase/Configuration (= 0.0.22)
    - HLBase/Encrypt (= 0.0.22)
    - HLBase/Language (= 0.0.22)
    - HLBase/Namespace (= 0.0.22)
    - HLBase/Storage (= 0.0.22)
    - HLBase/Utility (= 0.0.22)
  - HLBase/Configuration (0.0.22):
    - XCGLogger
  - HLBase/Encrypt (0.0.22):
    - CryptoSwift
  - HLBase/Language (0.0.22):
    - HLBase/Storage
  - HLBase/Namespace (0.0.22)
  - HLBase/Storage (0.0.22):
    - WCDB.swift
    - HLBase/Configuration
  - HLBase/Utility (0.0.22):
    - KeychainAccess
    - HLBase/Language
    - HLBase/Namespace
    - HLBase/Storage

DEPENDENCIES: # 项目的所有 (一级) 依赖 (与 Podfile 中相同)
  - RxCocoa
  - RxSwift
  - SnapKit
  - HLBase

SPEC REPOS: # cocoapods 的 specification 所使用的 repo(包括中央仓库与私有索引库)
  https://github.com/cocoapods/specs.git: # cocoapods 中央仓库
    - RxCocoa
    - RxSwift
    - SnapKit
  http://192.168.1.203/iOS/HLBase.git: # 私有索引库
    - HLBase

SPEC CHECKSUMS:
  RxCocoa: d62846ca96495d862fa4c59ea7d87e5031d7340e
  RxSwift: fd680d75283beb5e2559486f3c0ff852f0d35334
  SnapKit: a42d492c16e80209130a3379f73596c3454b7694
  HLBase: b42d492c36e80209330a3376f73596c3454b7694

PODFILE CHECKSUM: f8b3099f001ab0c4af1a4210feb102dfff3b7105

COCOAPODS: 1.5.3
podspec 文件相关
podsepc 模板
Pod::Spec.new do |s|

  # 基础信息
  s.name         = "HLTest"
  s.version      = "0.0.1"
  s.summary      = "HLTest_summary"
  s.description  = <<-DESC
      HLTest1 by HanleyLee
                   DESC
  s.homepage     = "https://hanleylee.com"
  s.license      = "MIT"
  s.author             = {"HanleyLee" => "hanley.lei@gmail.com" }
  spec.social_media_url   = "https://twitter.com/Hanley_Lei"

  # 平台信息
  s.platform     = :ios, "10.0"
  s.ios.deployment_target = '10.0'

  s.source       = {:git => 'git@github.com:HanleyLee/HLTest.git', :tag => s.version, :submodules => true}
  s.source_files  = "HLTest/**/*.{swift}"

  s.libraries     = 'z', 'sqlite3' # 表示依赖的系统静态库, 比如 libz.dylib 等
  s.frameworks    = 'UIKit','AVFoundation' # 表示依赖系统的框架
  s.vendored_frameworks = 'Thirdparty.framework' # 项目中使用的第三方 framework
  s.vendored_libraries = 'Library/Classes/libWeChatSDK.a' # 表示依赖第三方 / 自己的静态库 (比如 libWeChatSDK.a),
                                                          # 依赖的第三方的或者自己的静态库文件必须以 lib 为前缀进行命名, 否则会出现找不到的情况,
                                                          # 这一点非常重要
  spec.swift_versions = "5.0"
  s.public_header_files = 'YourPodName/Classes/**/*.h' # 暴露给外部的头文件

  s.dependency 'RxSwift'
  s.dependency 'RxCocoa'
  s.dependency 'RxDataSources'
  s.dependency 'RxSwiftExt'
  s.dependency 'AsyncSwift'
  s.dependency 'Charts'
  s.dependency 'SnapKit', '~> 5.0.0'
  s.dependency 'SwiftMonkeyPaws', '~> 2.1.0'
  s.swift_version = '5.0'
  s.resource_bundles = {
    'HLResources' => ['HLTest/Resources/**/*']
  }
  s.resources = ['YJDemoSDK/Assets/*.png'] #资源, 比如图片, 音频文件等

end
podspec 文件中定义文件位置
- 定义根目录中的文件
s.source_files = "test01/**/*.{swift,m}": 将 test01 文件夹下所有文件夹 (递归地) 中的.swift与.m类型文件添加到根目录s.source_files = "test01/**/*": 将 test01 文件夹下所有文件夹 (递归地) 中的所有类型文件添加到根目录, 同s.source_files = "test01/**/*.{*}"s.source_files = "test01/*": 仅将 test01 文件夹下 (不涉及 test01 的子文件夹) 的所有类型文件添加到根目录
- 自定义文件夹并向其添加文件ruby
   s.subspec 'Modules' do |ss|
      ss.source_files =  'HLNewsModule/HLNewsModule/Modules/**/*{.swift}'
      ss.dependency 'HLNews/Utility'
      # ss.dependency 'HLNews/Models'
      # ss.dependency 'HLNews/Views'
   end
Podfile 中与 podspec 中指定库版本的关系
在私有库开发时, podspec 文件确定了本库在使用时所需要依赖的各种其他库 (服务于使用者), Podfile 文件则确定了本库在开发时要使用的各种其他库 (服务于开发者).
这两个文件所依赖的库应该一一对应 (系统库除外, 因为 Podfile 中不需要声明系统库)
题外话, 开发者 A 开发 a 组件时由于引入了 RxSwift 而生成的 Podfile.lock 文件对于总项目 R 其实没有任何影响, 因为在 R 运行时, 只会根据 R 的
Podfile文件来找到组件 a 的podspec文件, 再根据podspec中的配置在 App 中导入相应的文件
组件化开发中最低支持系统版本版本确定问题
同一个库被一个项目只能持有一个版本, 不能持有多个版本
组件的最低支持版本完全依赖于 Podfile, Podfile 中没有规定的依赖但是在私有库中被规定的也会遵循 Podfile 的 iOS 最低部署 version 进行拉取适当版本
会有一些特殊情况, 例如: 主项目和私有库都依赖了 Snapkit, 主项目 Podfile 最低版本为 iOS 10, 私有库 a 的最低支持版本为 iOS 9, 那么在拉取 Snapkit 时就会选择 Snap 5.0 进行拉取, 这时私有库中的 Snapkit 就会报错, 因为 Snap5.0 不能支持私有库的 iOS 9.0 版本部署.
在 cocoapods 中使用静态库依赖
Xcode 9 之后支持了 Swift 的 Static Library, 但是使用 Swift + CocoaPods 的项目并没有办法使用 Static Library, 因为 CocoaPods 不支持. 在 CocoaPods release 1.4 版本的时候, 终于支持了在 use_framework! 的情况下使用 Static Library, 但是对于 Swift 和 Objective-C 混编的项目还是未能完美支持; 终于在 1.5 版本, Swift 的项目能用上 Static Library 了!
目前使用 Swift 静态库依赖有两种解决方案:
在 pod 的
podspec中声明命令s.static_framework = true主项目 <- A, 在依赖A使用s.static_framework = true的情况下, 即使主项目的Podfile中指定了use_frameworks也依然会将A作为静态库引入- 在项目中添加脚本文件, 通过对 cocoapods 执行步骤的捕获完成所有依赖项的静态化
- 在项目文件夹下添加
patch_static_framework.rb文件, 文件内容如下:rubymodule Pod class Installer class Analyzer def determine_build_type(spec, target_definition_build_type) if target_definition_build_type.framework? # 过滤掉只能动态库方式的framework,或者不确定的framework dynamic_frameworks = ['xxxxx'] if !dynamic_frameworks.include?(spec.root.name) return BuildType.static_framework end root_spec = spec.root root_spec.static_framework ? BuildType.static_framework : target_definition_build_type else BuildType.static_library end end end end end - 在项目的
Podfile文件中添加命令require_relative 'patch_static_framework'
- 在项目文件夹下添加
在 Playground 中使用 cocoapods
- 安装 cocoapods-playgrounds 插件bash
sudo gem install cocoapods-playgrounds - 安装要进行学习测试的库bash
pod playgrounds RxSwift - 打开
.xcworkspace文件 (与常规 iOS 项目安装 pod 基本相同) - 安装完成. 使用时直接
import RxSwift即可
如果需要安装额外的库, 可以在
Podfile中添加, 然后通过pod install安装也可以在创建时直接基于多个 pod 创建 playground,pod playgrounds RxSwift, RxCocoa如果遇到.xcworkspace项目中的 playground 打不开的情况, 可以自定义创建 playground 文件然后拖放进去
Target 嵌套
同一个 Workspace 中的 Proejct 文件对于其他 Project 是默认可见的, 这些 Projcts 会共享. Cocoapods 默认会将所有依赖的 pod 各自作为一个 target 放置在一个新建的 Project 中, 新 Project 依赖所有的 pod, 然后本 project 依赖新 project 产生的 framework

因此, 我们可以使用下面的写法对 target 的重复依赖进行嵌套
target 'Demo1' do
  pod 'Alamofire'

  target 'Demo2' do
    target 'Demo3' do
    end
  end
end
使用这种写法后, Demo3 的父节点是 Demo2, Demo 的父节点是 Demo1, 因为 Demo1 依赖了 Alamofire , 因此 Demo3 也依赖了 Alamofire
抽象 target
在嵌套中, 如果我们不想依赖父节点所依赖的某个 pod, 那么可以使用 abstract_targe 来实现
abstract_target 'Networking' do
  pod 'Alamofire'

  target 'Demo1' do
    pod 'RxSwift'
  end

  target 'Demo2' do
    pod 'ReactCocoa'
  end

  target 'Demo3' do
  end
end
将网络请求的 Pod 依赖抽象到 Networking target 中, 这样就能避免 Demo2 对 RxSwift 的依赖.
依赖与其依赖之间的关系
A -> B -> 项目如上, 项目引用了 组件 B, 组件 B 引用了 组件 A, 那么在项目的 Podfile 里不需要指明 组件 A(会默认导入 组件 A)
在项目中如果要使用 组件 A 的内容的话需要 import A, 只 import B 并不能让我们使用 组件 A 的内容 (当然我们可以在 组件 B 中使用 @exported import 来全局引入, 然后在项目中使用 import B 即可使用 组件 A 的内容了)
常见问题及解决方案
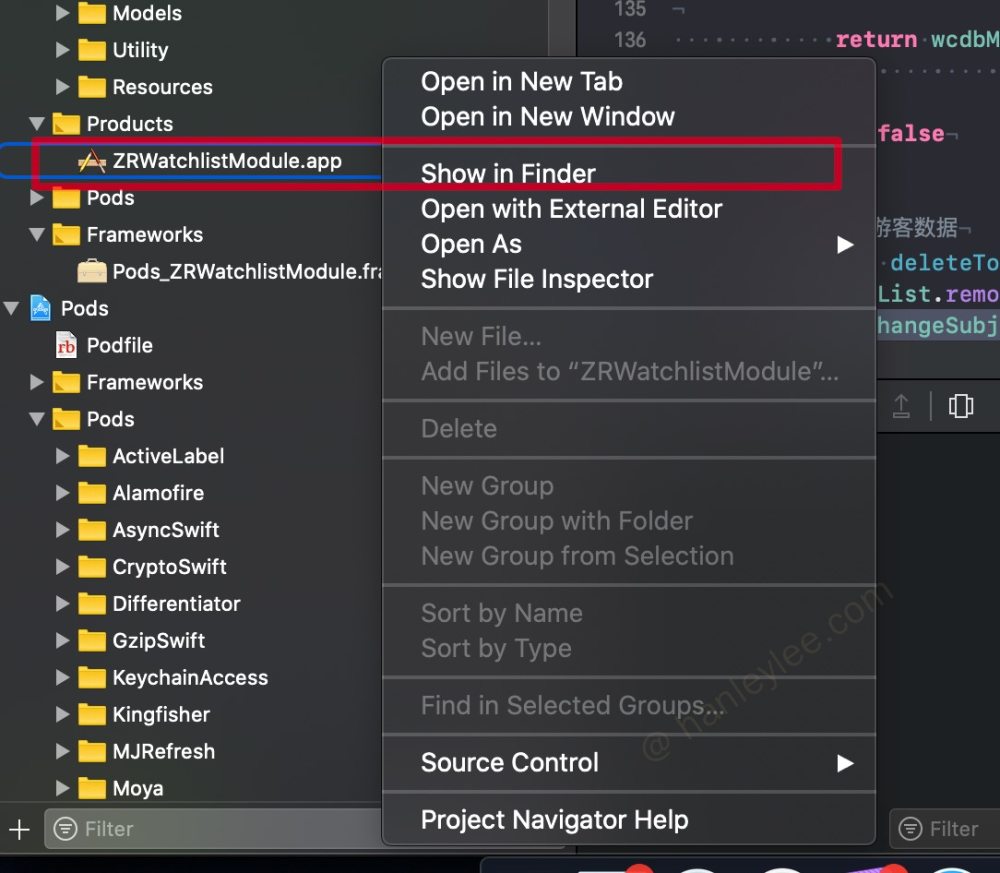
主项目中修改组件内容时 clean 后重新编译速度慢
如果直接在项目里修改了组件, 删除 Products 文件夹下的 .app 文件然后正常 ⌘ R 运行即可生效 (可以大大减少等待时间)
更新私有库 时 pod update 速度慢
原因
使用私有库时, pod repo update 会更新所有的私有索引库, 以及 master 库, 顺序是
- 更新私有索引库
- 更新
master库
由于组件更新时我们需要在引用组件的项目中更新组件, 这时使用 pod update 也会更新全部库
解决办法
- 使用
pod repo update更新前面的私有索引库 - 在更新到
master库时由于比较慢, 我们可以直接⌃ C取消master库的更新 - 然后在项目里使用
pod update --no-repo-update
you may set use_modular_headers! globally in your Podfile
The Swift pod `WCDB.swift` depends upon `WCDBOptimizedSQLCipher` and `SQLiteRepairKit`, which do not define modules. To opt into those targets
generating module maps (which is necessary to import them from Swift when building as static libraries), you may set `use_modular_headers!` globally
in your Podfile, or specify `:modular_headers => true` for particular dependencies.
在 cocoapods 1.5.0 之后, 安装包含 swift 第三方库的时候, 不限制必须在 podfile 内声明 use_frameworks!. 但是, 如果 swift 库依赖 OC 库, 就需要在 OC 库内允许 :modular_headers => true
当导入第三方 Swift 库时, 第三方库本身必须已经 define modules 以供本项目生成 module maps.
解决办法
Podfile文件中全局指定use_modular_headers!- 单独库指定
:modular_headers => true - 此问题只有在以默认方式 (静态库方式) 导入时才会出现, 否则不会出现, 因此也可以直接使用
use_frameworks!来解决
进一步分析
那么, Swift 引用 OC 时为什么要开启 modular headers? 事实上, 开启 modular headers 的本质就是将 pod 转换为 Modular(也就是支持模块), 而 Modular 是可以直接在 Swift 中 import 的, 不需要再经过 bridging-header 进行桥接, 从而简化了 Swift 引用 OC 的方式.
只有支持了模块的框架,才能支持通过模块化头文件(Modular Header)的方式进行导入。Clang 支持模块编译,能够加速编译,减少出错。我们可以通过添加 modulemap 文件使框架支持模块。
Could not build objective-c module ‘Alamofire’
错误原因
有时候需要先编译一下引入的包
解决方法
- 点击
Xcode左上角把scheme换成Alamofire ⌘ B编译- 点击
Xcode左上角把scheme换成主target - 运行
The repo MySpecs at ../../../.cocoapods/repos/MySpecs
错误原因
在本地的 ~/.cocoapods/repo/MySpec 的私有索引库文件夹下, git 的状态并不是干净的, 可能有未提交的改动, 最常见的就是 .DS_Store 文件
解决办法
cd ~/.cocoapods/repos/MySpecs, git clean -f

git reset --hard HEAD
WCDB 必须以动态库方式导入进项目
WCDB 导入时必须指定 use_frameworks, 因为 WCDB 依赖了 WCDBOptimizedSQLCipher 库, 此库是一个 C 库, Swift 代码中导入 OC/C 库时有两种方式
- 以静态库导入
C/OC库, 使用桥接文件 - 以动态库导入
C/OC库, 不用其他任何操作
因为 WCDB 作为 Swift 库 库导入了 OC 库, 但是并没有使用桥接文件, 所以我们的项目如果想导入了 WCDB 后不报错那么只能:
- 等待 WCDB 官方维护人员使用桥接文件方式将
WCDBOptimizedSQLCipher进行引入 - 以动态库全局导入所有第三方库
为 Flutter 制作私有库时 i386 架构编译不通过
在为 Flutter 制作私有库后, 使用 pod lib lint --verbose 命令校验不通过, 在验证 i386 架构时提示 ld: framework not found Flutter
错误原因
Flutter.xcframework 的结构如下
.
Flutter.xcframework
├── Info.plist
├── ios-arm64_armv7
└── ios-arm64_x86_64-simulator

3 directories, 3 files
因此其并没有 i386 架构, 故验证失败
解决办法
在 Flutter.podspec 中的 s.pod_target_xcconfig 设置中排除掉 i386 架构即可
s.vendored_frameworks = 'Flutter.xcframework'
s.pod_target_xcconfig = { 'EXCLUDED_ARCHS[sdk=iphonesimulator*]' => 'i386' }
注意
podspec文件名应与文件中的spec.name相同, 否则会报错- 版本库与代码库为同一库的情况下, 会在库中创建存放版本号的文件夹, 此文件夹的名称为
pod名, 因此不要事先在与podspec文件同级路径下使用pod名来命名文件夹, 否则会发生错误. - 在
pod repo push ...步骤中, 会根据已经pod repo add ...的仓库地址进行git push, 并生成一个新的commit, 命名为module + 版本号 - cocoapods 是根据验证邮箱来确认的用户, 如果用户不是
a则没有权限更新a名下的所有 pods - 所有位于
Cocoapods中央仓库上的 pods 不得重名 (GitHub 的repo名可以重复, 但是用户名不能重复) podspec文件中spec.version规定的部署系统等级与使用私有库时Podfile中的platform是相关的, 如果spec.version等级大于platform的话是不能使用的, 如果之前可以使用, 之后因为库升级了导致spec.version等级变高, 那么如果platform等级不进行对应变化, 那么将不能更新, 只能使用旧版私有库pod的命令中的repo指的是 specification 的 repo, 在~/.cocoapods/repo目录中的都是specification的repo, 包括中央仓库与私有仓库~/.cocoapods/repos/下的中央仓库只会下载版本号, 同目录下的私有索引库也只有下载版本号 (有一些私有库方案是版本库与源码库是放在一个仓库的, 这时候就会直接将此仓库完整下载到~/.cocoapods/repos中)- 如果在一个
xcworkspace项目中改动了Pods文件夹中的第三方库文件 (包括对文件改动以及新增文件等操作), 在使用了pod update更新库后这些操作的痕迹都会被抹除掉 pod repo push <私有库索引名> <podspec 文件>会对私有库的引用依赖以及自身进行各种验证, 如果依赖较多, 验证时间会很久, 如果足够自信自己的库的引用没有问题, 那么可以直接在版本库中加入版本号文件 (因为验证成功后 cocoapods 也只是在版本库中加入了一个新的podspec文件)pod 'Moya'后, 可以在import Moya后使用 Moya, 但是不能直接使用 Alamofire, 如果要使用 Alamofire, 还需要手动指定import Alamofire. 当然也可以通过在基础组件中加入@exported import ...来避免重复写import ...podspec中的subspec是子模块, 可以起到子模块间各自独立的作用, 项目引入了含有子模块的组件后在Pods文件夹中可以看到子模块都是由文件夹分隔的, 便于区分, 但是子模块越多打包构建时间也就越长.
参考
本博客文章采用 CC 4.0 协议,转载需注明出处和作者。