版本管理工具 Git 的使用
就软件开发来说, 不管是个人开发还是团队协作, 版本管理工具肯定必不可少. 其中分布式版本管理工具 git 由于其优良的性能, 可靠的安全性最为被接受, 也是最为普及的.
在完整地看了几个教程并且实战了一段时间后, 我将日常使用的命令以及个人理解总结成本文. 本文涉及内容有初级, 有高级, 如果能完全掌握这些命令绝对能在工作中祝你一臂之力. 建议收藏以备以后检索相关命令. 😁
分布式存储与集中式存储的区别
- 都有一个中央仓库
- 团队合作开发中每个人的仓库最终都必须同步到中央仓库
- 中央式存储没有个人仓库的概念, 因此只有做完一个小功能后上传到中央仓库才会有一个记录节点. 这样会导致一个提交里面包含很多代码, 不利于回溯.
- 分布式存储有个人仓库, 每个人做完一个极小的功能后可以先
commit, 然后再 push, push 到中央仓库后也会将自己的诸多小commit传上来.(如果不需要那么多小commit的话可以使用rebase依次合并多个小commit然后再统一push) - 分布式存储由于在每个机器上都会有完整的存储仓库, 因此本地占用会比较大, 初次 clone 也会稍微费事一些
- 结合以上特点, 由于软件开发主要是文本代码, 而这些资料的占用空间并不大, 而且软件开发对历史回溯要求比较高, 因此一般都是使用分布式存储. 集中式存储主要用于某些占用体积超大的项目开发领域, 比如大型游戏.
Git 特点概括
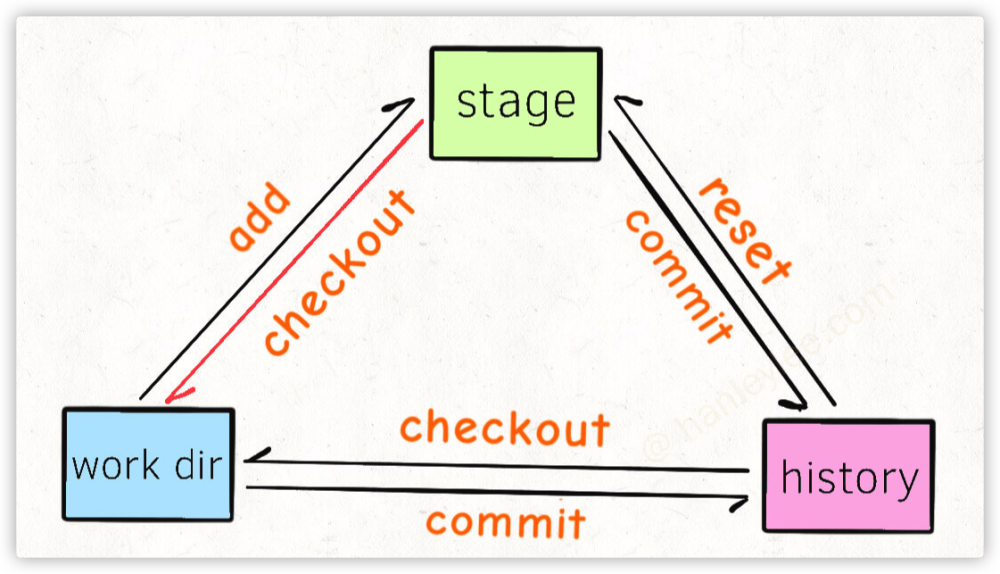
Git的管理是目录级别, 而不是设备级别的, 即两个不同的目录存着同样地址的仓库的话会被认为是两个不同的仓库, 可以用于模拟为两个人.git是以 line 为最小单位进行判断的, 即如果序号1的行被 branch 修改了, 序号2的行被master修改了, 那么在merge branch与master的时候结果就是序号1与2都被修改了. 但是两个branch都在序号1的行修改了, 那么就会冲突, 会提示手动解决冲突. 一个仓库中的文件都会被 git 系统监视, 一共有以下 3 种状态未被跟踪: 新建文件都不会被跟踪. 需要手动add进入暂存区已保存: 已经在系统中保存了此文件, 被放在保存区未放入暂存区(changes not staged for commit)已暂存:commit(changes to be commited), 被放入暂存区. 等待commit中
- 其实
reset的三个状态正好对应了文件的几种保存状态--hard: 回退commit, 将两个commit之间的改动放入暂存区, 再将暂存区所有文件放到保存区, 再将保存区文件删除. 最硬的--mixed: 回退commit, 将两个commit之间的改动全部放入暂存区, 再将暂存区所有文件放到保存区--soft: 回退commit, 两个commit之间的改动全部放入暂存区. 最软的.
reset的三种模式中, 只有hard会直接将文件直接转为未提交commit之前的状态- 一个已被跟踪的文件被改动了, 只要保存更改就会被放入保存区. 此时可以
- 使用
git checkout -- filename来永久撤销文件修改. - 使用
git add命令将更改放入暂存区等待commit.
- 使用
- 未放入
staged area的修改不会被commit. - 如果一个文件未被跟踪 (
untracked file), 那么Git系统只会提示你在git文件夹中有一个未被跟踪的文件, 哪怕对齐进行修改git也不会关心其修改内容. 只要add一次就可以永久跟踪. show显示的是commit状态及细节,diff显示的是文件的修改状态和细节- 在对文件修改时, 只会在当前
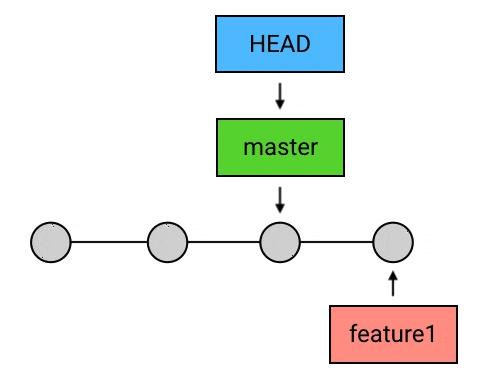
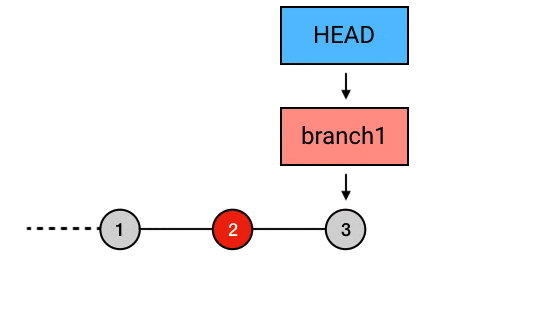
branch进行修改, 在push时, 也只会将此内容push到远端的此 branch git中的head和branch都是引用 (reference), 其内存储的都是各个commit的sha1值. 引用都以文件形式存储在.git目录中, 当git工作时, 通过这些文件的内容判断整个仓库的结构.- 每个仓库只能有一个 head, branch 可以有多个
head指向的branch不能被删除, 必须签出到另一个 branch 方可删除git中的branch只是一个对commit的引用, 删除branch并不会删除任何commit(不过如果一个commit不在任何branch上, 那么这个commit就是一个野commit, 其在一定时间后会被Git的回收机制自动删除)checkout的本质是移动head到指定的commit, 即如果后面跟的是branch, 此命令会签出 此branch所对应的commit. 如果后面跟的是commit, 那么直接签出该branch, 比如git checkout 78a4bc,git checkout HEAD^,git checkout 78a4bc^. 不过需要注意如果根据commit值来签出, 那么会导致head变为detached状态, 哪怕签出的位置在某个branch上也不行. 想离开这种detached状态可以使用git checkout <branch name>命令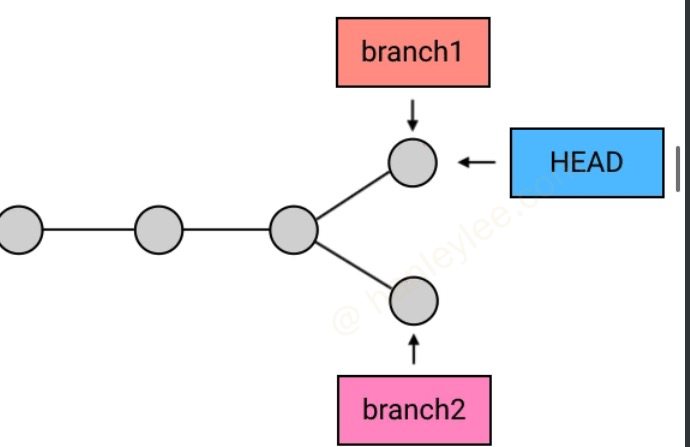
merge会创建一个新的commit来使两个branch的最新commit进行融合, 但是merge会出现几种冲突情况:- 两个
branch中的同一个文件的同一行被各自branch修改了 (只能手动选择保留部分了) - 目标
commit(需要被merge的commit) 与head所指向的commit并不存在分叉, 而是head领先于目标commit: 此时merge不会创建一个新的commit, 因为没有需要合并的, 什么也不会做 - 目标
commit与head所指向的commit不存在分叉, 但是head所指向的commit落后于目标commit: 此时merge依然不会创建一个新的 commit(因为没哟需要合并的内容), 此时会将head指向的commit快速向前移动 (fast-forward). 这其实非常常见: 本地没有提交, 但是同事开发了新内容并合并到了master上, 本地pull的时候会先 进行fetch, 然后merge, 此时merge的目标commit即领先于 head 指向的commit, 这个时候就会进行fast-forward)
- 两个
merge后branch不会被自动删除- 没有被
merge的branch在删除时会失败 (但是如果确认某个branch完全没有作用了, 一定要删除, 那么可以将git branch -d改为git branch -D来强制删除) pull=fetch+mergepush并不会上传head到远端, 即远程仓库永远只会指向master. 这也是为什么从远端clone下来后在第一次使用时总是指向master的.- 不是最新的几次提交不能用
git reset. 不是最新的一次提交不能用git commit --amend rebase可以合并commit, 修改之前某次commit, 删除之前某次commit, 属于 git 中的高深用法.- 在
git中有两个偏移符号^与~,^表示根据head向左偏移,~表示根据branch向左偏移 tag可以理解为 不可移动的branch, 通常用来为项目节点做标记cherry-pick: 把选中的commit一个个合并
Git 常用命令
git help <command>: 对 git 的某一命令查看帮助, e.g.git help configgit help --web log: 在浏览器中查看git log的用法git help --man log: 在 man 中查看git log的用法git -C path/to/repo: 指定 repo 的路径进行相关 git 操作, 写脚本时非常有用(可以避免 cd)git ls-remote <url> --tags origin | cut -f 1: 获取远程仓库 origin 分支最新的 commit 值git --git-dir=/path/to/repo/.git rev-parse origin/<targeted-banch>: 获得本地仓库分支的最新 commit 值git symbolic-ref --short HEAD: 获得当前分支名git rev-parse --abbrev-ref HEAD: 获得当前分支名(同上)git clone: 克隆仓库git clone <link> [foldername]: 从远端链接拉取项目, link 可以为https连接, 也可以为ssh连接, 最后的 foldername 表示可以指定文件夹名称git clone -b master <link>: 克隆远程仓库到本地, 并 checkout 到master分支git clone -b 0.0.5 <link>: 克隆远程仓库到本地, 并 checkout 到 tag0.0.5上git clone --recursive <link>: 递归克隆, 在项目包含子模块时非常有用git clone --depth=1 <link>: 克隆深度为 1, 只克隆最后一条, 减少克隆时间git clone --bare <link>: 裸克隆, 没有工作区内容, 不能进行提交修改, 一般用于复制仓库git clone --mirror <link>: 镜像克隆, 也是裸克隆, 区别于包含上游版本库注册
git status: 状态git status: 查看当前branch的当前状态与最近一次commit相比, 暂存区 & 保存区 & 以及未跟踪文件的状态, 提交前一定要用git status -s: 以短格式输出git status --ignore-submodules: 忽略子模块git status --ignored: 显示忽略的文件
git init: 初始化git init: 将当前目录直接作为git的工作路径并生成一个.git文件夹git init [repo name]: 将repo name作为工作路径并在repo name文件夹下剩下一个.git文件夹git init repo.git --bare: 创建一个repo.git的文件夹并将其作为 git 库, 其内直接包含.git文件夹内的所有文件, 相当于去除了工作区
git config [range] [command] [option]: 配置 git 环境range: 有三种级别, system, global, local, sytem 针对当前系统所有用户的所有 repo, gloabl 针对当前用户的所有 repo, local 只针对当前 repo, 他们的关系是如果下一级的 config 没有对某项配置做自定义, 就自动引用上一级的 config 相关配置--system: 将 config 配置写入/etc/gitconfig--global: 将 config 配置写入~/.gitconfig文件--local: 默认级别, 将 config 配置写入当前 repo 的.git/config文件中
command: 命令--list: 列出当前 repo 的所有 config 信息 (如果使用了 global 则列出 global 的 config 信息)--unset: 取消 config 中某项配置 (后跟 option), 也可以通过编辑.gitconfig或config文件来达到同样目的--unset-all: 取消 config 中所有配置--remove-section: 移除某组配置--rename-section: 重命名某组配置
option: 具体配置--user.name: 设置用户名, 安装 git 必设置--user.email: 设置用户邮箱, 安装 git 必设置--core.editor: 设置 git 的默认编辑器, 默认为 vi 或 vim--merge.tool: 设置 git 的合并工具alias.st status: 设置 git 的某些快捷别名, e.g.git config --global alias.st status的作用是让git st指向git status
git config --global --unset user.name: 删除相关配置, 可以是--global, 也可以是--localgit config --global -e: 编辑当前仓库配置文件, 等价于vim ~/.gitconfiggit config --global https.proxy http://127.0.0.1:1087: 配置代理git config --global http.proxy http://127.0.0.1:1087: 配置代理git push: 推送本地仓库到远程git push origin test: 将当前 branch push 到远程的test分支上(其本质是提交本地分支test指针到origin, 相当于拷贝refs/heads/test到远程引用refs/remotes/origin/test并提交)事实上
git push命令也可以进行push, 不过git push只能push从远端pull或者clone下来的branch, 对于由本地直接创建的branch就无能为力了, 或者本地创建的仓库使用git push --set-upstream origin branch1命令指定了本仓库对应的远程仓库分支, 这样也能直接使用git pushgit push origin test -f: 强制push, 在本地仓库与远程仓库有差别被拒绝的时候但是自己很清楚的时候使用. 但是如果冲突发生在master的话就不要用了. 很危险.git push origin <local branch1>:<remote branch2>: 将本地branch1推送到远程branch2上remote branch2不写的话表示将本地分支branch1推动到远程同名branch上local branch2不写的话代表将空分支推送到远程branch2上, 也就是表示删除远程branch2
以下四种书写方式效果是一样的:
git push origin mastergit push origin master:mastergit push origin master:refs/heads/mastergit push origin refs/heads/master:refs/heads/master
git push -u origin HEAD: 将当前分支名推送到远程同名分支(远程没有同名分支的话会自动创建)git push -u origin branch1: 将 branch1 分支推送到远程同名分支(远程没有同名分支的话会自动创建)git push origin --all --force: 将本地所有分支强制提交到远端git push --tags: 推送所有tag, 不推送commitgit push --follow-tags: 推送commit的同时会把当前branch上的所有tag进行推送git push --atomic origin <branch name> <tag>: 将git push origin <branch name>与git push <tag>作为一个原子命令, 一旦原子命令中的任何一个失败, 则整个原子命令失败git push origin 9790eff:master: 将本地9890eff以前的所有commit推送到远端git push origin --delete master: 删除分支, 等价于git push origin :mastergit push origin :<old name> | git push origin <new name>: 重命名远程分支 (方法 1), 原理是先删除远程某分支, 然后将本地当前分支推送到新命名的远程分支上git push b_origin refs/remotes/a_origin/main:main: 将a_origin的main分支推送到b_origin的 main 分支上git push b_origin refs/remotes/a_origin/main:refs/heads/main: 同上, 不过在b_origin没有main分支时会自动创建该分支
git fetch: 从远端获取仓库对应分支的最新状态git fetch -a: 从远端获取仓库所有分支的更新 (不合并任何分支)git fetch --all --prune --force --tagsgit fetch origin: 手动指定了要fetch的remote, 在不指定分支时通常默认为mastergit fetch origin dev: 指定远程remote和FETCH_HEAD, 并且只拉取该分支的提交git fetch origin branch1:branch2: 从服务器拉取远程分支branch1到本地为branch2, 并使branch2与branch1合并git fetch b_origin main:refs/remotes/a_origin/main: 将b_origin的main分支拉取到本地a_origin的main分支上
git pull: 从远端拉取仓库最新状态并与本地仓库合并git pull -a: 从服务器远端拉取仓库的所有分支的更新, 并将当前分支对应的远程分支的更新合并到本地当前分支上 (不合并其他分支)git pull orign test: 从服务器拉取远端名为test的branch并与本地当前的branch合并 (这个命令适用于在本地git branch <name>或git checkout -b <name>刚建立了一个新的本地分支, 然后从服务器的指定分支拉取commit到本地此新分支上)git pull origin master --rebase: 以变基方式拉取远端主分支到本地master分支, 主要用于第一次拉取远端分支git pull origin branch1:branch2: 从服务器远端拉取branch1分支合并到本地的branch2分支, 如果本地没有branch2分支的话则新建. 然后将拉取到的分支合并到当前所处的分支上git pull origin master:master: 从服务器拉取远程master到本地master上, 然后合并, 然后将 master 分支 merge 到当前所处的分支上. 这个比git fetch多了一步 (合并master到本分支), 因此要慎用, 最好用git fetch, 然后自行判断git pull origin master:master --rebase: 与上一种功能类似, 不过是将当前分支rebase到master分支上
git remote: 远程仓库git remote -v: 查看远程仓库地址git remote add origin <url>: 在没有远程仓库的基础上添加远程仓库地址git remote set-url origin <url>: 在有 origin 的基础上直接重新设置远程仓库地址git remote rm origin: 删除远程仓库地址git remote show origin: 查看远程仓库信息 (比如 push 与 pull 地址, 远程仓库当前 head 指向, 远程仓库当前分支)git remote rename oldname newname: 重命名远程仓库git remote remove origin: 移除远端跟踪
git show: 查看最近一次commit(head所指向的commit) 修改的文件和内容git show --stat: 查看最近一次commit的统计信息 (修改了多少处)git show 5e68b0d8: 查看sha值为5e68b0d8的commit修改内容git show 5e68b0d8 a.txt: 查看sha值为5e68b0d8的commit中 a.txt 文件的具体修改情况
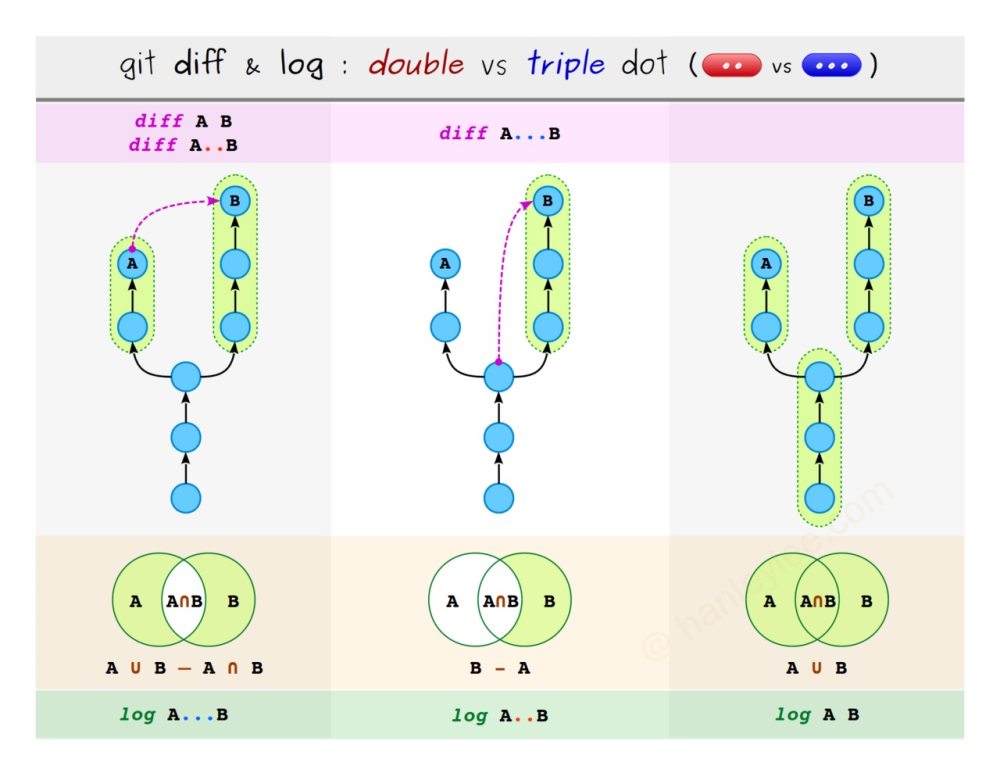
git diff: 显示目前的保存区与最近一次commit的原工作目录相比有什么差异. 即, 在git add后会向暂存区提交什么内容git diff --staged: 查看暂存区与最近一次commit的原工作目录相比有什么差异. 即, 这条指令可以让你提前知道你commit会提交什么内容. 这个命令与git diff --cached完全等价git diff master..branch: 比较master与branch之间的不同git diff 0023cdd..fcd6199: 比较两个commit之间的不同git diff master..master~2 -- README.md: 比较两个commit之间的README.md不同git diff -- README.md: 查看当前分支README.md文件的变动git diff adt312d: 查看adt312d这个commit与当前最新commit的异同(从 adt312d 到 HEAD 中间有什么变化)git diff E..A^ | git apply: 先获取从 E 到 A 的前一个节点之间的变化, 然后这个改动就是这几个 commit 的逆操作, 使用git apply将其应用到代码上, 然后再addcommitgit diff A..B: 对比AB两个提交的差异git diff A...B:AB两次提交的共同祖先和B之间的 diffgit diff --theirs: 在合并冲突时表示当前冲突相对于 theirs 的变化
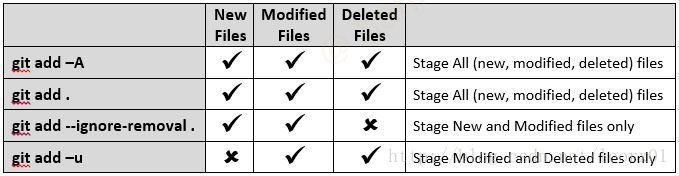
git ls-files: 列出本分支下所跟踪的文件列表git add: 添加改动到暂存区 (staged area), 虽然add后添加的是文件名, 但实际上添加的是改动 (如果a.txt改动后被add, 然后再次被改动a.txt的另一处, 那么在git status时会警告a.txt既在暂存区又不在)git add./README.md: 仅暂存当前目录下的README.md文件git add <file1> <file2>...: 一次暂存多个文件git add.: 提交本路径下的全部更改 (新文件, 修改文件, 删除文件)(会忽略.gitignore中列出的新增文件)git add -A: 同git add., 不过添加的是本仓库的所有路径下的更改 (会忽略.gitignore中列出的新增文件)git add -u: 只提交已经跟踪文件的修改 (不理会新文件)git add --ignore-removal.: 只提交新文件与修改文件 (不理会删除文件)git add --all -- ':!path/to/file1' ':!path/to/file2' ':!path/to/folder1/*': 排除指定路径下的改动(path 可以使用/表示 repo 的根目录)git add -- . ':!path/to/file1' ':!path/to/file2' ':!path/to/folder1/*': 排除指定路径下的改动git add --patch filename.txt: 暂存一个文件的一部分, 会打开交互模式, 使用 s 进行存储操作git add -N filename.txt: 暂存一个新文件的一部分, 会打开交互模式, 使用 e 手动选择需要添加的行
git merge: 合并分支git merge test: 将名为test的branch合并到当前head所指向的分支git merge --abort: 在出现merge conflict状况时放弃此次merge, 会恢复到merge之前的状态.git merge --continue: 解决冲突后继续mergegit mergetool: 在合并出现问题时使用此工具进行手动合并git checkout --conflict=merge file: 重新标记文件为unmerged(待合并状态)
git merge develop -q: 以安静模式合并, 吧 develop 分支合并到当前分支并不输出任何消息git merge develop --no-edit: 合并时使用默认的合并消息git merge develop --no-commit: 合并分之后不进行提交
git cherry-pick: 挑选commitgit cherry-pick commit1 commit2 commit3: 将三个commit合并入本branchgit cherry-pick commit1 commit2 commit3 --no-commit: 将三个commit的内容放入本branch的暂存区但是先不合并git cherry-pick 00b44e4..b135951: 连续 commitgit cherry-pick -x commit1: 在合并时将commit1的原有作者信息进行保留
git commit: 提交通过add命令放入暂存区的改动git commit -a: 提交全部更改 (默认将所有修改文件及删除文件添加进暂存区)git commit -m "message": 使用message作为commit的标题直接提交git commit --amend: 对最新的commit进行修改 (此操作不会直接在原commit上进行修改, 而是将新修改内容与最新commit内容进行融合, 据此创建一个新的commit并进行替换)git commit --amend --no-edit: 在amend的基础上, 不进入修改 message 界面git commit --amend --reset-author: 默认情况下amend并不会重置第一次author的时间, 使用--reset-author可以重置author时间为当前时间git commit --author "HanleyLee <hanley.lei@gmail.com>": 指定 author 的方式进行 commitGIT_COMMITTER_NAME="HanleyLee" GIT_COMMITTER_EMAIL="hanley.lei@gmail.com" git commit --author "HanleyLee <hanley.lei@gmail.com>": 同时设置author与committergit commit --allow-empty-message: 允许提交空消息, 通常必须有消息git commit -v: 在填写信息的界面显示所有变动 (diff格式的)
git stash: 将保存区与暂存区的文件 (未commit的) 临时放入一个空间 (注意: 未跟踪的文件不会被stash), equal togit stash save/git stash pushgit stash save "test": 保存时添加注释(already depreated, usegit stash push)git stash push: 将保存区与暂存区的文件git stash push -m "test": 将保存区与暂存区的文件, 对 stash 命名git stash list: 查看当前保存列表git stash show stash@{0}: 显示更改的相关文件git stash show -p stash@{0}: 显示所有的更改 (更加详细)git stash pop: 将stash空间保存的文件还原到保存区中git stash pop stash@{1}: 恢复指定 stash, 具体编号可以通过git stash list查找git stash apply: 与 pop 命令相同, 不过不会从 stash 列表中移除git stash clear: 清空所有保存的 stashgit stash drop stash@{0}: 清除指定 stashgit stash drop: 清除最近一次git branch分支管理git branch test: 从head所指向的commit处创建一个名为test的新的branchgit branch branch1 origin/branch1: 从本地下载的远程branch1处在本地建立一个branch1分支git branch -r: 显示本地所有分支git branch -a: 显示本地及远程所有分支git branch -r: 显示远程端所有分支git branch -vv: 查看本地分支所关联的远程分支git branch --set-upstream-to=origin/branch1 branch1: 设置本地 branch1 所追踪的远程分支为origin/branch1git branch --set-upstream-to=origin/branch1: 设置本地当前 branch 所追踪的远程分支为origin/branch1git branch -u origin/branch branch: 同--set-upstream, 也是追踪远程分支git branch --unset-upstream: 移除跟踪git branch -d test: 删除名为test的branchgit branch -D test: 强制删除名为test的branch(即使没有被 merge 的分支也可以删掉, 如果删除之后想恢复, 那么使用git checkout -b branch-name hash即可)
git branch -r -d origin/hanley: 删除本地已经下载的远程分支, 同时要执行以下两个命令中任意一个:git push --delete origin <branch name>: 使用删除命令直接删除远程branchgit push origin:<branch name>: 使用推送命令将一个空branch推送到远程以达到删除该 tag 的效果
git branch -m <old name> <new name>: 重命名本地分支git branch -M <old name> <new name>: 强制重命名本地分支git branch -f <branch> <commit>: 重新定义 branch 的起始节点到某个commitgit branch -m <old name> <new name>|git push origin:<old name>|git push --set-upstream origin <new name>: 重命名远程分支 (方法 2), 先本地重命名, 然后删除远程某分支, 最后推送并设定推送到的远程branch名git branch --merged: 查看已经合并的branchgit branch --no-merged: 查看未合并的branchgit branch --merged | xargs git branch -d: 删除已经合并的branchgit branch --show-current: 输出当前分支, 同git rev-parse --abbrev-ref HEADgit branch --contains <commit-id>: 列出所有包含 commit 的分支git branch --contains dcc5ae4 | grep -E '(^|\s)branch$' &>/dev/nul: 过滤包含 commit-id 的分支(可以用来判断一个分支是否包含某个 commit)git branch $(git symbolic-ref --short HEAD) --contains $COMMIT_ID: 限定结果只展示当前分支git branch | grep -o -m1 "\b\(master\|main\)\b": 打印默认分支(master or main)git reflog show --data=iso master: 查看本地master分支的创建时间git switch <branch1>: 切换分支
git merge-base: Find as good common ancestors as possible for a merge.git merge-base --is-ancestor $COMMIT_ID $BRANCH: 判断分支是否包含指定 commit, 比git branch $BRANCH --contains $COMMIT_ID更好
git checkout: 签出git checkout myfile.txt: The contents of myfile.txt will be copied from thestaging areato theworking directorygit checkout .: Same as above, but apply to all current directorygit checkout HEAD myfile.txt: Take the version of myfile.txt that is in head’s parent and copy it to both the staging area and the working directorygit checkout 3dbs22 a.txt: Same as abovegit checkout test: 签出名为test的branch对应的commit(work dir与staged area的改动不会被重置, 可以使用-f参数进行重置)git checkout -f master: 强制切换到 master, 未保存的改动(包括work dir与staged area)会被丢弃git checkout HEAD^^: 将HEAD向左两位的commit签出 (即倒数第三位)git checkout head~3: 将head向左三位的commit签出 (即倒数第四位)git checkout 3d122b: 将sha值为3d122b的commit签出, 此时会导致head变为detached状态, 想离开这种detached状态可以使用git checkout <branch name>命令git checkout -b test: 创建一个名为test的branch并签出到该branch对应的commitgit checkout -b test origin/test: 在本地创建名为test的branch并跟踪远端的test分支git checkout -t origin/dev: 在本地创建名为dev的branch并跟踪远端的dev分支, 通常是在本地没有远程分支才会本命令git checkout --detach: 使head与branch分离, 使head直接指向commitgit checkout --conflict=diff3 test.txt: 将文件重置回冲突状态, 适用于 merge 时发生冲突后没有完全解决时被一些其他工具将文件标记为了解决git checkout --conflict=merge test.txt: 将文件重置回冲突状态git checkout --ours test.txt: 在合并冲突时选择ours作为解决方案git checkout --theirs test.txt: 在合并冲突时选择theirs作为解决方案
git blame: 责怪~git blame <filename>: 查看某个文件的修改历史记录, 含时间, 作者, 以及内容git blame -L 11,12 <filename>: 查看谁改动了某文件的 11~12 行git blame -L 11 <filename>: 查看 11 行以后的所有改动人git blame -l <filename>: 显示完整的 hash 值git blame -n <filename>: 显示修改的行数git blame -e <filename>: 显示作者邮箱git blame -enl -L 11 <filename>参数组合查看修改者
git restore: 重置git restore <filename>: 将保存区的此文件更改全部重置, 降级! 与git checkout -- <filename>功能相同git restore --staged <filename>: 将暂存区文件转移至保存区, 降级!git checkout -- *git checkout -- *.mdgit checkout -- 123.md 345.md
git reflog: head 记录git reflog:reference log的缩写. 可查看Git仓库的head的所有移动记录. 可以在误删 branch 等情况下使用git reflog master: 查看关于master的所有head的移动记录.git reset --hard HEAD@{3}: 恢复到指定节点状态
使用
git reset --hard hash也可回退到 reflog 对应的节点上git rm: 移除git rm <filename>: 删除对文件的跟踪, 并删除本地文件 (在工作区中保留, 但从版本库中移除, 如果已经放入暂存区的话会报错)git rm --cached <filename>: 取消对某个文件的跟踪. 而不删除本地文件(在工作区中保留, 但从暂存区和版本库中移除)git rm -f <filename>: 删除对文件的跟踪, 并删除本地文件 (已添加到暂存区时使用).f是强制的意思git rm -r --cached <foldername>: 取消对某个文件夹的跟踪.r为递归的意思.git rm -r *会将当前目录下的所有文件与子目录删除git rm -rf.: 清除当前目录下的所有文件, 不过不会删除.git目录-n: 所有的rm命令后面加上此命令后, 不会删除任何东西, 仅作为提示使用
git clean <command>: 清理未被tracked的文件,git reset只能让跟踪的文件回复到某个版本状态, 对于未跟踪的文件无能为力, 如果想要完全移除未跟踪的文件, 那么就要使用git clean -df, 此命令常与git reset配合使用 (默认情况下,git clean命令只会移除没有忽略的未跟踪文件, 如果也需要移除已被gitignore忽略的文件, 则需要加x)-f: 强制删除. 如果Git配置变量clean.requireForce未设置为false,git clean将拒绝删除文件或目录, 除非给定-f,-n或-i.-f <path>: 删除指定路径下untracked files-d: 除了未跟踪的文件之外, 还要除去未跟踪的目录.-X: 仅删除当前目录下gitignore里忽略的文件, 那些既不被git版本控制, 又不在gitignore中的文件会被保留.-x: 不使用gitignore的忽略规则, 删除本路径下所有的untracked files-n: 将此命令加在上面三个命令前, 先看看会删除哪些文件 (相当于演习一遍). e.g.git clean -n -xfd-i: 使用交互式删除, 每一个文件的删除都有提示, 更加安全
git tag: 不可移动的标识点, 通常用来作为里程碑标记, 最广泛的使用就是作为版本标记git tag: 显示所有taggit ls-remote --tags origin: 列出远程所有标签(不加 origin 也可以)git tag <tag name>: 为最新 commit 的创建 taggit tag <tag name> <commit name>: 为之前的某个 commit 点创建 taggit show <tag name>: 显示指定 tag 信息git tag -d <tag name>: 删除本地的指定 tag; 如果想要删除远程的 tag, 需要先在删除本地 tag, 然后使用:git push origin --delete tag <tag name>: 使用删除命令直接删除远程tag(或使用git push origin --delete tag <tag name>)git push origin:refs/tags/<tag name>: 使用推送命令将一个空 tag 推送到远程以达到删除该 tag 的效果
git push origin <tag name>: 推送指定 tag 到远程git push origin --tags: 推送所有本地 tag 到远程git tag -l | xargs git tag -d&&git fetch origin --prune: 先删除本地所有分支, 然后从远端拉取所有分支, 适用于远端的 tag 被修改但是本地 tag 仍然是旧的git tag -l v1.*: 筛选符合条件的 taggit tag -a v1.4 -m "my version 1.4": 创建含标注的 tag, 并为此标注直接添加信息 (标注可通过 git log 查看)git tag -a v1.2 9fceb02: 为之前的提交打 tag, 会进入填写 message 界面git fetch --tags: 拉取远程所有 tag
git revert: 添加与之前commit完全相反的commitgit revert HEAD^: 增加一条与当前head指向的commit的内容完全相反的commit. 从而达到”中和”的效果以对其进行撤销. 用在错误内容已经合并在master但是需要修改的时候.git revert OLDER_COMMIT^..NEWER_COMMIT
git reset: 重置到某个commit(第一个参数是提交的 SHA-1, 默认是 HEAD, 第二个参数如果不写则是整体重置, 否则只重置单个文件)git reset a.txt: 将文件 a.txt 从HEAD中还原到staged area, 然后再退回到work dir中 (默认使用的是mixed)git reset --mixed HEAD a.txt: 是上一个命令的全称git reset HEAD./README.md: 仅重置某文件到HEADgit reset --hard HEAD^^:HEAD^^表示需要恢复到的commit, 因此这个命令表示将 track 的文件直接恢复到上上一个commit, 其后的所有commit全部丢弃 (如下图所示, 虽然commit不被任何branch指向了, 但是Git不会立刻删除它, 还是可以通过sha1值来复原的), 一般与 git clean 联合使用git reset 17bd20c: 相当于把HEAD移到了17bd20c这个commit, 而且不会修改work dir中的数据, 所以只要add再commit, 就相当于把中间的多个commit合并到一个了.
git rebase: 变基git rebase master: 在branch上执行此命令. 将branch上从与master交叉的commit之后的所有commit依次提交到master最新commit之后 (就是将节点 5, 6 的内容在master分支再次提交一次). 如果想指定基础点参考 这里
git rebase -i <commit>: 交互式变基, 可合并 commit, 剔除 commit 等git rebase -i HEAD~10: 将当前 head 向前数 10 个的所有 commit 进行变基git rebase --continue: 解决冲突后, 解决冲突, 并git add, 然后使用本命令可继续 rebase 操作, 不需要git commitgit rebase --abort: 产生冲突时, 放弃本次 rebase, 恢复到 rebase 之前的状态git rebase origin/main: 变基对象为 origin 远程分支
git rebase 的作用是变基, 在合并时可以先切换到 branch1, 然后对 master 进行 rebase, 没有冲突的话直接完成操作, 有冲突的话先解决冲突, 然后
git add, 然后git rebase --continue, 这样 branch1 的 commit 就完全挪到了 master 之上, 这时再切换到 master 分支上, 使用git rebase branch1(或git merge branch1), 可以达到fast-forword的效果. 最后可以 push 到远程仓库, 这样自己的新的 commit 就在 master 上整齐地排列着了.git rerere: 自动解决冲突, 需要提前设置git config --global rerere.enabled truegit log: 显示commit的提交记录 (并不会显示add操作)--patch: 是git log -p的全写, 可以查看每个commit的细节--stat: 查看每次文件提交更改的统计信息 (修改了多少处)--oneline: 以一行的格式查看本branch的commit记录 (仅 sha2, branch, commit title 以及顺序信息)--merges: 只显示合并的commit--no-merges: 不显示合并的commit--graph: 图表形式 (竖线, 斜线) 显示 commit 顺序及关系--decorate: 装饰作用, 显示当前 head, tag, branch 的效果--all: 显示所有commit信息, 否则可能会只显示本branch的commit, 省略其他分支的commit-S Swift: 显示关键字中有Swift的 commit-[number]: 显示最近多少次的commit记录--pretty=format:"[option]": 以固定格式输出commit信息%H: 提交的完整哈希值%h: 提交的简写哈希值%T: 树的完整哈希值%t: 树的简写哈希值%P: 父提交的完整哈希值%p: 父提交的简写哈希值%an: 作者名字%ae: 作者的电子邮件地址%ad: 作者修订日期 (可以用 –date= 选项 来定制格式)%ar: 作者修订日期, 按多久以前的方式显示%cn: 提交者的名字%ce: 提交者的电子邮件地址%cd: 提交日期%cr: 提交日期 (距今多长时间)%s: 提交说明$d: decorate 效果 (显示当前 head, tag, branch)%C(<color>): 为跟在后面一个参数设置颜色或字体, e.g.git log --pretty=format:"%C(bold red)%h%Creset -%C(bold green)%d %C(bold yellow)%s %Creset- %C(red)%cd %Creset- %C(dim green)%an" --date=format:'%Y-%m-%d %H:%M:%S' --graph- 一个颜色+一个内容
- 颜色以%C 开头, 后边接几种颜色, 还可以设置字体, 如果要设置字体的话, 要一块加个括号
- 能设置的颜色值包括: reset(默认的灰色), normal, black, red, green, yellow, blue, magenta, cyan, white.
- 字体属性则有 bold, dim, ul, blink, reverse.
- 内容可以是占位元字符, 也可以是直接显示的普通字符
--date=<option>: 通过预置的选项设置 log 中 commits 的日期格式relative: 显示距当前时间多少, e.g. “2 hours ago”local: 显示本地时间, e.g “Wed Feb 26 18: 03: 14 2020”default: 显示当前时区及时间, e.g. “Wed Feb 26 18: 03: 14 2020 +0800”iso: 以 ISO 8601 格式显示时间rfc: 以 RFC 2822 格式显示时间short: 只显示日期, e.g. “2020-02-26”raw: 显示 git 的原始格式, e.g. “1582711394 +0800”
--date=format:'<option>': 通过占位符设置 log 中 commits 的日期格式 e.g.--date=format:'%Y-%m-%d %H:%M:%S'%a: Abbreviated weekday name%A: Full weekday name%b: Abbreviated month name%B: Full month name%c: Date and time representation appropriate for locale%d: Day of month as decimal number (01 – 31)%H: Hour in 24-hour format (00 – 23)%I: Hour in 12-hour format (01 – 12)%j: Day of year as decimal number (001 – 366)%m: Month as decimal number (01 – 12)%M: Minute as decimal number (00 – 59)%p: Current locale’s A.M./P.M. indicator for 12-hour clock%S: Second as decimal number (00 – 59)%U: Week of year as decimal number, with Sunday as first day of week (00 – 53)%w: Weekday as decimal number (0 – 6; Sunday is 0)%W: Week of year as decimal number, with Monday as first day of week (00 – 53)%x: Date representation for current locale%X: Time representation for current locale%y: Year without century, as decimal number (00 – 99)%Y: Year with century, as decimal number%z, %Z: Either the time-zone name or time zone abbreviation, depending on registry settings; no characters if time zone is unknown%%: Percent sign
配置完自己喜爱的配色后, 使用可以为 git 命令定义别名方便下次使用, e.g.
git config --global alias.lg "log --pretty=format:'%C(bold red)%h%Creset -%C(bold green)%d %C(bold yellow)%s %Creset- %C(red)%cd %Creset- %C(dim green)%an' --date=format:'%Y-%m-%d %H:%M:%S' --abbrev-commit --graph"git log --oneline --graph --all: 以图表, 简洁形式显示 commit 信息git shortlog -sn: 列出提交者贡献数量, 只会打印作者和贡献数量git shortlog -n: 以提交贡献数量排序并打印出 messagegit shortlog -e: 采用邮箱格式化的方式进行查看贡献度
git bisect: 黑魔法, 使用二分法查看哪一个 commit 产生的 buggit bisect start [end] [start]: 启动查错,end是最近的提交,start是更久以前的提交. 启动之后会定位到end&start的中点git bisect good: 标记此 commit 为正确的, 意味着问题是在后半段产生的git bisect bad: 标记此 commit 为错误的, 意味着问题是在前半段产生的git bisect reset: 完成二分查找, 回到最近一次代码提交
git update-ref -d refs/remotes/origin/HEAD: removeorigin/HEADgit symbolic-ref refs/remotes/origin/HEAD refs/remotes/origin/master: createorigin/HEADgit symbolic-ref refs/remotes/origin/HEAD: 获得远程默认分支, master 或 maingit symbolic-ref --short -q HEAD: 获得本地当前分支git archive [option] [branch/commit] [from path]: 导出代码 (可支持下载远程仓库指定文件夹, 不支持 GitHub)--format tar.gz: 导出的格式, 使用git archive --list可以查看当前 git 所支持的所有格式; 如不指明, 则使用 –output 的文件名推断文件格式--output "./output.tar.gz": 将存档写入<file>而不是 stdout.--remote git@192.168.1.203:iOS/ZRCombineViewer.git: 指定远程仓库位置, 如不指定则导出当前目录下仓库的代码--exec=<git-upload-archive>: 与 –remote 一起用于指定 git-upload-archive 远程端的路径.--verbose: 实时显示最新进展--prefix=<prefix>/: 在所有文件命前加入前缀
bash// 写入压缩文件 git archive --remote git@192.168.1.203:iOS/ZRCombineViewer.git -o test.zip master fastlane/actions fastlane // 下载后解压到指定文件夹 git archive --remote git@gitlab.com:HanleyLee/helloworld.git --format=tar --prefix=junk/ master | (mkdir ~/Desktop/t1 && cd ~/Desktop/t1/ && tar xf -)git --git-dir=$HOME/projects/foo/.git --work-tree=$HOME/projects/foo status: 查看某个文件夹的 git 状态git remote set-head origin master: 如果使用git branch -a时发现没有origin HEAD, 那么可以使用本命令手动添加 HEADgit remote set-head origin -d: 与上面相反, 此命令可以删除origin HEAD
committer 和 author 的区别
author 是做出修改的人, committer 是最后提交到 git 中央仓库的人
.gitignore 文件
git 是根据 .gitignore 文件来判断是否监视一个文件 (夹) 的, 如果文件在 .gitignore 中被列出, 那么即使该文件被添加, git 也不会提示对其进行跟踪, 如果一个文件夹下被加入到 .gitignore 文件, 那么其自身及其内文件 (夹) 都不会被跟踪.
如果在添加 .gitignore 文件之前已经不想同步的内容已经被 git 跟踪了, 那么需要将其移除出跟踪区, 使用 git rm --cached <filename>.
使用 git clean -fX 可以将被忽略的文件全部删除 (一般不用)
不同步指定文件
.gitignore 文件可以让 git 忽略某些文件, 或者在忽略全部文件的情况下不忽略某些文件
在没有
.gitignore的情况下创建一个新文件touch.gitignore
# 忽略根目录及子目录下名为 `secret.md` 的文件
secret.md

## 忽略根目录及子目录下 `config` 文件夹下的 `secret.md` 文件
config/secret.md

# 忽略根目录及子目录下 config 下的 Markdown 文件
config/*.md

# 忽略根目录及子目录下的 build 文件夹
build/
# 忽略根目录及子目录下的 build 文件及文件夹
build
# 忽略当前目录的 build 文件
/build
只同步指定文件
touch.gitignore
# 忽略根目录下的所有文件及文件夹
/*

# 同步名为 normal.md 的文件, 但是如果文件夹未被同步, 那么文件夹内的此文件不会被 git 跟踪到, 也自然不会被同步
!normal.md

# 同步根目录下的 `config` 文件夹及其内文件 (夹)
!/config
如果需要只同步子文件夹下的某个文件, 有两种方法
- 先设置同步子目录
- 然后设置不同步子目录所有内容
- 再设置同步子目录指定文件
/*
!/config
/config/*
!/config/normal.md
全局忽略文件
git config --global core.excludesfile.gitignore_global- 在本地用户根目录下创建
.gitignore_global文件, 在其中设置需要全局忽略的文件类型 (下面的忽略按需使用)
# "#"是.gitignore_global 中的注释行
# Compiled source
*.pyc
*.com
*.class
*.dll
*.exe
*.o
*.so

# Packages
# it's better to unpack these files and commit the raw source
# git has its own built in compression methods
*.7z
*.dmg
*.gz
*.iso
*.jar
*.rar
*.tar
*.zip

# Logs and databases
*.log
*.sql
*.sqlite

# OS generated files
.DS_Store*
ehthumbs.db
Icon?
Thumbs.db
git diff 信息理解
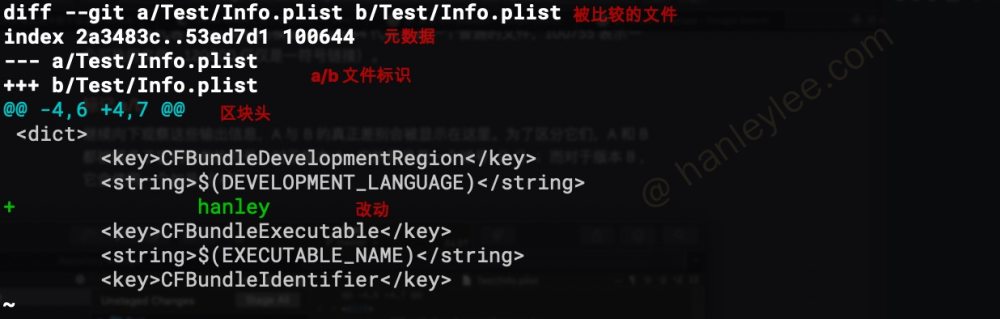

- 被比较的文件:
diff命令会对两个文件进行比较, 一个文件被设定为a, 另一个被设定为b - 元数据: 刚开始的
2a3483c与53ed7d1代表两个文件的hashes. 后面的100644代表这是一个普通文件, 如果是10755则代表是一个可执行文件,120000代表是符号链接. - a/b 文件标识: 使用
-作为a的标志, 使用+代表b的标志 - 区块头:
-代表来自文件a/Test/stash.txt,1代表从第一行开始,2代表从第一行开始的2行代码. 因此整句连起来:a文件 (旧文件) 从第一行开始的2行内有数据被改动,b文件 (新文件) 从第一行开始的3行内有数据改动 - 改动:
+代表是新文件的改动. 如果是-则是旧文件的改动, 而旧文件的改动就是删除内容, 新文件的改动就是增加内容
rebase 使用
使用交互式 rebase 修改 / 删除之前某次提交的 commit
git rebase -i 目标 commitbashgit rebase -i HEAD^^ // 在 git 中有两个偏移符号 ^ 与 ~, ^ 表示根据 head, ~表示根据 branch 向左偏移. 这个命令表示将当前 commit rebase 到 HEAD 之前 2 个的 commit 上.在编辑界面中指定需要操作的
commits将
pick修改为edit(含义是使用这个commit, 但是停下来等待修正) 『使用pick代表选取, 如果直接删除这一行就代表跳过这个commit, 那就是把这个commit删除了』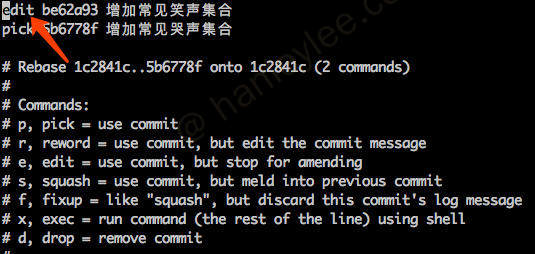
退出编辑界面
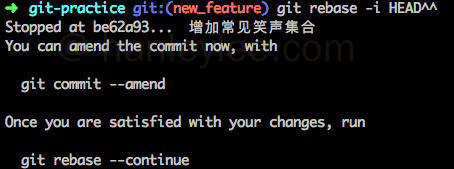
- 根据提示修改最后使用
amend进行修正提交 - 操作完成之后用
git rebase --continue来继续rebase过程各个commit回复到原位
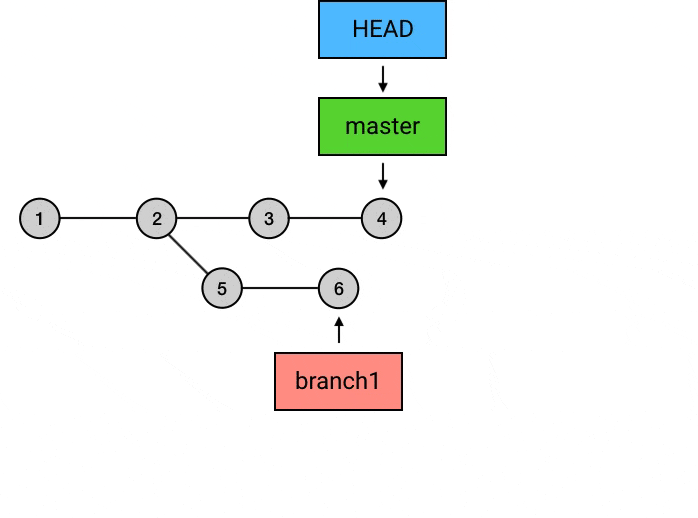
git rebase –onto 撤销历史 commit
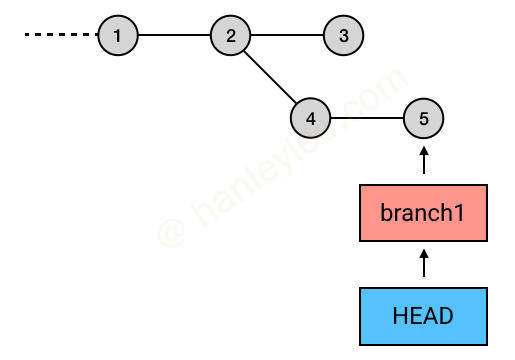
如上图所示, git rebase commit3 会将 4 与 5 自动链接到目标 commit 3 之后, 因为 rebase 的起点是 Git 自动指定的, 起点判定为当前 branch 与要 rebase 到的 branch 的交点, 在此例中就是 2. 因此 2 之后的 commit 都会被 rebase 到 3 之后.
git rebase --onto commit3 commit4 branch1
// 此命令有三个参数, 依次为目标 commit, 起点 commit, 操作 branch
// 在上图中, 就是将起点 commit 之后的 5 放入目标 commit 3 之后.
通过这一特性可以选择性地删除 commit
git rebase --onto HEAD^^ HEAD^ branch1
// 以当前 head 指向 commit 的前一个 commit 为起点, 将起点之后的 commit 3 提交到当前 head 指向 commit 的前 2 个 commit 上. 这样就达到了剔除 commit 2 的目的
合并同一 branch 多个 commit
目标: 将 123 与 2 合并
使用
git log --oneline查看当前branch的commit记录
使用交互式变基,
git rebase -i dc8d, 修改2与123的pick为squash(也可以用fixup, 代表丢弃子commit名称)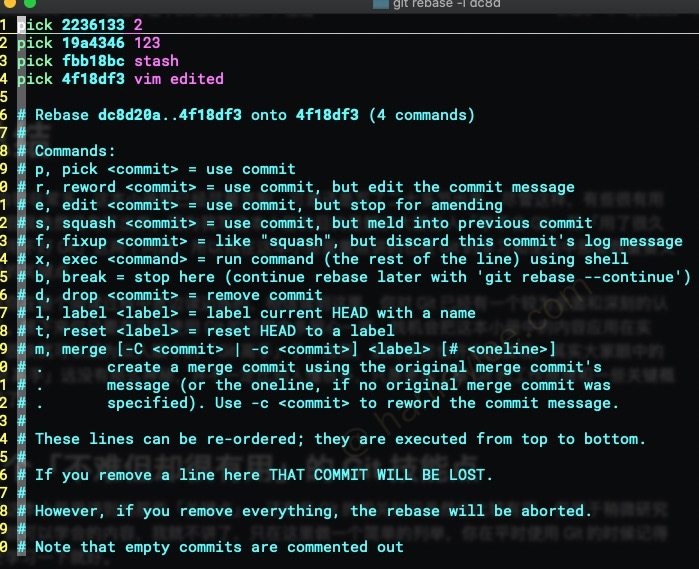
- 保存退出并并根据提示为新
commit赋予名称
使用 --depth 保证本地只有最新的 commit
我们有时可能只需要最新的一次 commit (比如出于硬盘空间考虑), 这个时候有以下两种办法:
- 在
clone时使用git clone --depth 1 url - 如果已经
clone了, 那么需要多步 (参考自 stackoverflow)git pull --depth 1git reflog expire --expire=all --allgit tag -l | xargs git tag -dgit stash dropgit gc --prune=all
git 辅助工具
gitup
git 仓库批量拉取更新
安装
brew install gitup常用命令
gitup --help: 查看 gitup 帮助信息gitup: 拉取更新所有被add到书签的仓库gitup.: 更新当前路径下的所有仓库--depth <num>: 指定递归深度, 默认为 3
gitup ~/repos/foo ~/repos/bar ~/repos/baz: 指定多个路径进行批量拉取更新 (默认对每个路径递归 3 层查找所有存在的 repo)gitup -a ~/repos/foo ~/repos/bar ~/repos/baz:--add, 将多个仓库添加到 gitup 的书签中, 便于使用gitup命令直接一键更新gitup -l:--list, 列出gitup目前所有add的仓库gitup -b ~/.config/gitup/bookmarks:--bookmark-file, 自定义指定书签文件gitup -d ~/repo:--delete, 删除已经add的仓库gitup -n:--clean,--cleanup, 删除路径已经变更的仓库的书签gitup -c:gitup --current-only, 默认情况下 gitup 将会拉取远端所有分支, 使用此命令可以只更新当前分支gitup -f:gitup --fetch-only, 默认情况下会pull, 此命令会只fetchgitup -p:gitup --prune: 默认情况下会在本地保留远端已经删除的branch, 此命令会保持远端与本地端branch完全一致gitup -e 'echo 123': 对所有的 repo 执行echo 123这个命令gitup -e 'bash -c "echo 123 && echo 456"'.: 使用bash -c的目的是可以使用&&语法
diff-so-fancy
git diff 高亮优化显示
安装
brew install diff-so-fancy配置
// Configure git to use d-s-f for *all* diff operations
git config --global core.pager "diff-so-fancy | less --tabs=4 -RFX"

git config --global color.ui true

git config --global color.diff-highlight.oldNormal    "red bold"
git config --global color.diff-highlight.oldHighlight "red bold 52"
git config --global color.diff-highlight.newNormal    "green bold"
git config --global color.diff-highlight.newHighlight "green bold 22"

git config --global color.diff.meta       "11"
git config --global color.diff.frag       "magenta bold"
git config --global color.diff.commit     "yellow bold"
git config --global color.diff.old        "red bold"
git config --global color.diff.new        "green bold"
git config --global color.diff.whitespace "red reverse"
icdiff
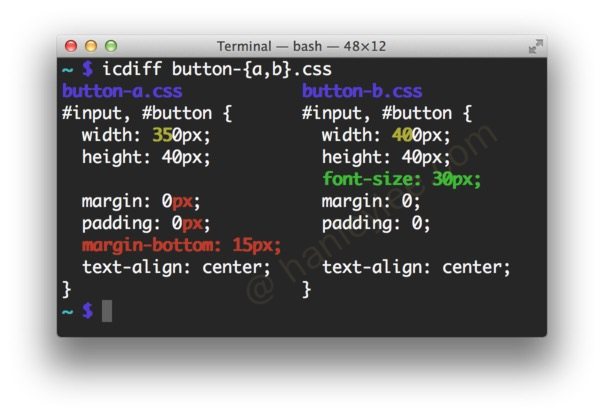
安装
brew install icdiff使用
function gdf() {
    params="$@"
    if brew ls --versions scmpuff > /dev/null; then
        params= `scmpuff expand "$@" 2>/dev/null`
    fi

    if [$# -eq 0]; then
        git difftool --no-prompt --extcmd "icdiff --line-numbers --no-bold" | less
    elif [${#params} -eq 0]; then
        git difftool --no-prompt --extcmd "icdiff --line-numbers --no-bold" "$@" | less
    else
        git difftool --no-prompt --extcmd "icdiff --line-numbers --no-bold" "$params" | less
    fi
}
scmpuff

安装
brew install scmpuff
echo "eval "$(scmpuff init -s)"" >> ~/.zshrc
使用
gs: 显示当前所有文件状态, 类似于git statusgit add 2 3 5-7: 按照gs的序号结果进行add
git-filter-repo
用于批量修改或删除历史记录中的内容
使用
git filter-repo --path badfile --invert-paths --force: 删除单个文件的所有历史提交git filter-repo --path output/*.dylib --invert-paths --force: 删除多个文件的所有历史提交git filter-repo --path output --invert-paths --force: 删除文件夹的所有历史提交
删除完之后使用 git push -f 强制推送到远端
GitHub
GitHub(或其他 git 管理平台) 使用流程
- 在
GitHub或者其他仓库管理平台创建一个仓库. 并复制仓库地址 - 在终端中使用
git clone将远程仓库下载到本地 - 在开发时将自己仓库创建出一个分支用于自己开发新功能.
- 新功能开发完毕后将 branch 上传到中央仓库让同事进行检查, 如果有问题的话继续修改直至没有问题. 如果没有问题的话就
checkout到本地仓库的masterpull以使本地master与远端master保持同步merge自己的branch到本地master,push master到远端
- 实际上为了保证项目的安全, 中大型项目的远端仓库
master都是被禁止直接push的, 因此步骤 4 的流程就会变成:- 让同事检查是否有问题, 没有问题就提交通过远端的
branch提交pull request(pull request是对于master分支来说的, 希望master能够pull本branch) - 成功
pull request后删除本branch
- 让同事检查是否有问题, 没有问题就提交通过远端的
连接方式
目前 GitHub 有两种连接方式, HTTPS 连接与 ssh 连接, 在 clone 时要选择对应的链接.
特点
- 本账户向本账户下仓库提交代码可以直接使用
https或者将自己电脑生成的ssh key加入到GitHub账户. - 本账户使用
HTTPS方式向另一账户下的仓库提交代码需成为对方账户的collaborator. - 本账户使用
ssh方式向另一账户的仓库提交代码需要将本账户所在电脑生成的ssh key加入到对方账户. ssh方式连接在每次push时无需再每次访问时输入密码- 如果
GitHub账户使用了二重验证还希望使用HTTPs那么必须使用access token作为密码进行登录.
SSH 连接方式
- 在终端使用
ssh-keygen方式生成 ssh key - 将
pub公钥加入到 GitHub 账户中 - 在仓库页面选择
ssh链接进行复制 - 在本地文件夹进行
clone
查看 / 更改连接方式
- 通过
git remote -v查看当前与远程的连接方式 - 修改为
HTTPs:git remote set-url origin https://github.com/HanleyLee/Lang.git - 修改为
ssh:git remote set-url origin git@github.com:HanleyLee/Lang.git
快捷功能
- 快捷键查看所有快捷键: 使用
shift + ?在所有 GitHub 页面上都可以查看快捷键 - 在评论中应用表情: 在评论中使用
:便会启动表情自动补全功能
提交信息操作 issue
我们可以在 commit 信息中添加以下格式的文本, 然后相对应的 issue 便会有相对应的操作
- 仅指向 issue
#24
- 删除对应 issue
fix #24fixes #24fixed #24close #24closes #24closed #24resolve #24resolves #24resolved #24
参考
本博客文章采用 CC 4.0 协议,转载需注明出处和作者。